
The NSX-T integrated Load Balancer is a great way to quickly and cheaply integrate a highly-available load balancer solution to PoCs, staging and small environments. In this article I will describe the steps to implement this in your existing NSX-T & vCloud Director environment.
UPDATE: During an upgrade of VMware Cloud Director to version 10.5.1 I recently performed, I encountered the Load Balancer in NSX-T to not be functional anymore. This was due to (at least to version 4.2.1) NSX-T isn’t able to handle TLS v1.3, while vCloud Director upwards of version 10.5 adds support and automatically activates the new standard, leading to SSL handshake failures on the server pool in the backend.
Preparations & Profiles
As you probably know, vCloud Director is quite picky with certificates and SSL configurations. So let’s give it it’s own SSL profile which we can customize according to best practice.
Disable unused TLS versions on vCloud Director
Head to Administration > Settings > SSL in the vCloud Director Provider Portal. Here, you can see the current SSL settings the vCloud Director cells run on. Starting with version 10.5, TLS 1.1 is deprecated and replaced with TLS 1.3, which unfortunately isn’t supported by the NSX-T integrated Load Balancer at the time of writing.
So, the first step for us is to unfortunately only allow TLS 1.2 until further notice. You can do this by following this article: Manage the List of Allowed SSL Protocols in VMware Cloud Director (vmware.com)
In short terms, log on as root-User to all cells via SSH and use the cell-management tool to configure the supported TLS versions. First list all current TLS versions vCloud Director currently supports:
/opt/vmware/vcloud-director/bin/cell-management-tool ssl-protocols -a
You can exclude the versions you don’t want to use (in our case everything except TLS 1.2) with:
/opt/vmware/vcloud-director/bin/cell-management-tool ssl-protocols -d TLSv1,TLSv1.1,TLSv1.3
Now, you can see the versions currently allowed via:
/opt/vmware/vcloud-director/bin/cell-management-tool ssl-protocols -l
Be sure to reboot all cells for the changes to take effect. Check back again at Administration > Settings > SSL in the vCloud Director Provider Portal to see the current TLS versions and ciphers. You will see something like this:

Create a Server-SSL-Profile for the NSX-T Load Balancer
On to creating the SSL profile for vCloud Director, which the Load Balancer will use communication with the backend servers (the Frontend of the vCloud Director cells).
Go to Networking > Load Balancing > Profiles in the NSX-T UI and switch the Profile Type to “SSL”. Now, add a Server SSL Profile.
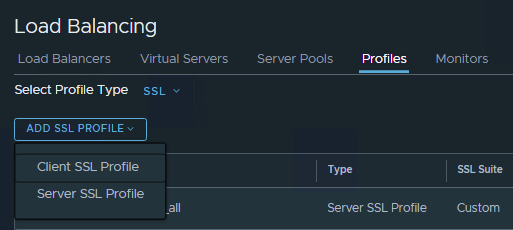
Name it something like “vcd-ssl” and switch the SSL Suite to “Custom”. Now you can specifically choose with SSL Protocols and Ciphers to use, in my case for the ciphers:
- TLS_ECDHE_RSA_WITH_AES_256_GCM_SHA384
- TLS_ECDHE_ECDSA_WITH_AES_256_GCM_SHA384
And for the version only “TLS_V1_2”.
Be sure to exactly name the ciphers as stated in the vCloud Director SSL settings page.

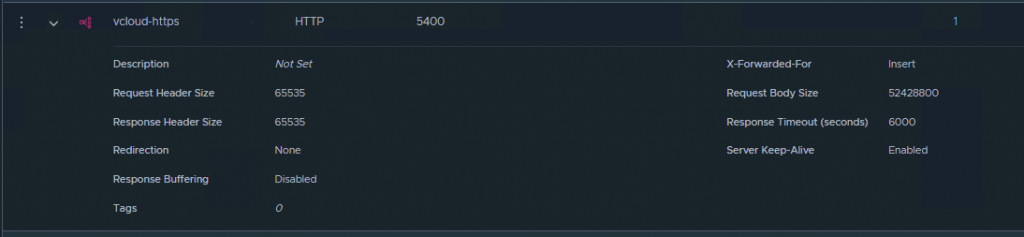
Create an Application Profile for vCloud Director
vCloud Director has specific requirements for Header and Body sizes of incoming connections regarding Uploads (for ISOs, OVAs, etc.) as well as larger API calls.
Go to Networking > Load Balancing > Profiles in the NSX-T UI and be sure the Profile Type is “Application”. Now, add an Application Profile of the HTTP-kind.
Set the values as follows:
| Request Header Size | 65535 |
| Response Header Size | 65535 |
| Request Body Size | 52428800 |
| Server-Keep-Alive | Enabled |
| Idle Timeout | 5400 |
| Response Timeout | 6000 |
If you’re experiencing console timeouts in the VM console via vCloud Director, manipulate the timeout values to your liking. I found these values to be acceptable for my environment, but keep in mind that the longer the timeout, the more “dead” sessions may be alive for the load balancer which will increase your load dramatically.
Add an active Monitor
Now let’s create an active monitor which will periodically check if the cells we’re adding to the server pool are still up & running. For this, head to Networking > Load Balancing > Monitors in the NSX-T UI.
Here, you can add an “Active Monitor” of the HTTPS-kind:
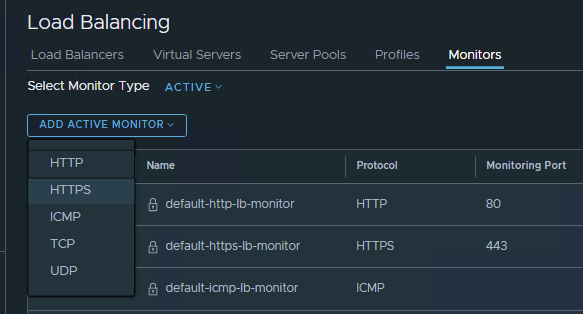
Set the Monitoring Port to 443 for default HTTPS and set the monitoring and timeout periods as you like. In my example im going for a monitoring interval of 10 seconds, with a timeout value of 5 seconds. You can also edit the Fall and Rise counts to manipulate the count of successful or failed monitoring attempts before a cell is removed or added to the productive server pool.
Now, on to the actual monitoring. vCloud Director provides a simple site which will tell you if the specific node you’re contacting is up and running.
Configure the “HTTP Request” section to perform a GET request to the vCD-URI “/cloud/server_status” (the IPs of the nodes will be populated by the server pool later).
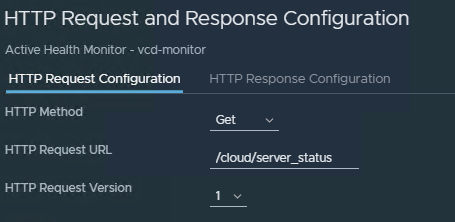
Be sure to set the “HTTP Response” settings to allow the status code 200 and to be successful when the Response Body is “Service is up.”
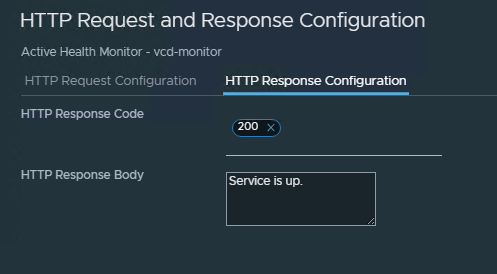
If these criteria are not met, the server pool will automatically disable the node and the load balancer will not forward requests to it.
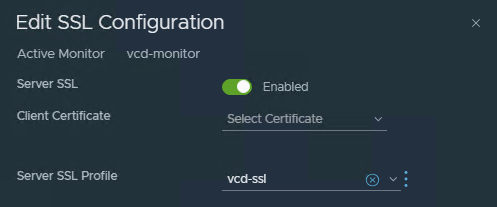
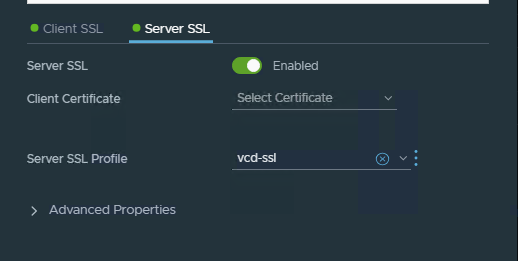
Set the “SSL Configuration” to be enabled and use your previously created Server-SSL-Profile.
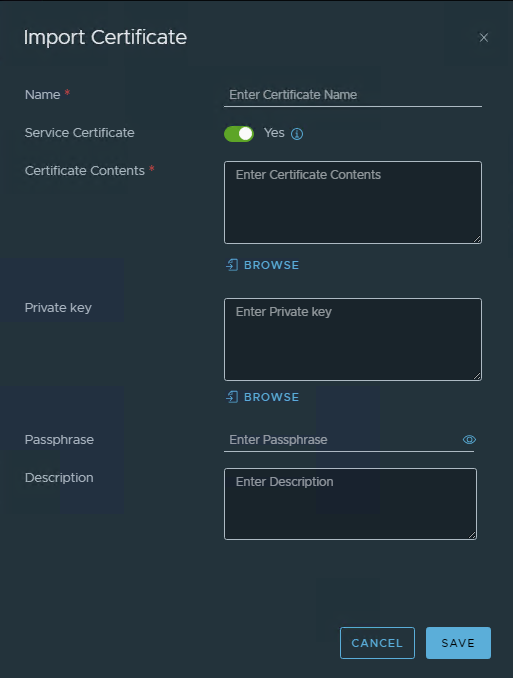
Add your Public SSL certificate to NSX-T
The now to be created Load Balancer will be accessible publicly, which means it has to serve the public SSL certificate to have a consistent chain from endpoint to server. Head to System > Certificates in the NSX-T UI and import the Certificate. Be sure to add the full chain as BASE64-encoded text, starting with server certificate. Leave the “Service Certificate” switch on, to mark it as a Certificate in use by services of the NSX-T instance.
Creating the Load Balancer
Now that the hard work is done, on to the fun part.
Go to Networking > Load Balancing > Load Balancers in the NSX-T UI and create a new Load Balancer attached to your specific Tier-1-Gateway. Be sure to properly size the Load Balancer according to the Tier-1-Gateway as well as the backing Edge Nodes.
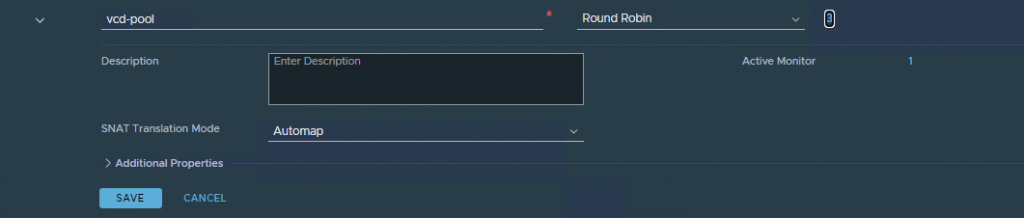
Now, go to Networking > Load Balancing > Server Pools in the NSX-T UI and create a new Server Pool containing all vCloud Director cells. Add your cells without any port and then attach the previously created Active Monitor to the pool.
Lastly, go to Networking > Load Balancing > Virtual Servers in the NSX-T UI and create a new Virtual Server of the “L7 HTTP”-kind.
Give it your desired Public or NAT-ed IP and set the Port to 443 for default HTTPS. In the newer vCD-Versions Console Traffic is routed through this as well and you don’t need a separate Load Balancer for the console proxy.
Choose your desired Load Balancer instances and the previously created server pool and set the application profile. Set the Persistence to “Source IP”, using the default source-ip-persistence Profile.
Last but not least, configure the SSL configuration to use your imported public SSL certificate and activate the Server-Side SSL with the previously created Server-SSL-profile.
That’s all! You can check the status of the Load Balancer down to the cells via the “status” values where you configured them.
The server pool should show all nodes as up if your monitor configuration is working correctly and the IP of the load balancer should be able to serve requests.
