This walktrough is outdated. Please see the posts for the 2024 updated version:
Updated Version
Please see the first part for instructions on how to set up the needed Kubernetes cluster for the NSX Application Platform.
Now that the Kubernetes cluster is up, tested, and functional, we can go on and deploy the NSX Application Platform.
Based on my experience the VMware-provided public repo at harbor.vmware.com is quite unreliable and slow, which is why I prefer to use a private harbor registry. Harbor is an open-source project by the Linux Foundation with a heavy influence from VMware. You can find their official site here: Harbor (goharbor.io)
If you want to try it yourself, you can also skip further down this page directly to the “Napp Deployment” section.
For the deployment, we’ll need another machine. It’s recommended to have at least 4 vCPUs, 8GB RAM, and 160GB of storage. This should also be enough, as the needed repository files for the Napp are about 30GB in size.
You can choose any Linux distribution you like – as in the first post, I will continue using Rocky Linux.
OS Preparation
First, let’s update the installed system and install some common tools.
sudo yum update -y
sudo yum install nano wget tar git -y
Harbor requires the following ports to be open:
sudo firewall-cmd --permanent --add-port=80/tcp
sudo firewall-cmd --permanent --add-port=443/tcp
sudo firewall-cmd --permanent --add-port=4443/tcp
sudo firewall-cmd --reload
We will also need a docker installation – add the repo and install the required packages as well as docker-compose:
sudo dnf config-manager --add-repo=https://download.docker.com/linux/centos/docker-ce.repo
sudo dnf install -y docker-ce docker-ce-cli containerd.io
sudo systemctl enable docker --now
sudo dnf install docker-compose-plugin
You will also need to have a certificate trusted on all nodes, including the Kubernetes-Cluster-Nodes and the NSX Managers.
By default, NSX Manager doesn’t trust internal Certificate Authorities even when they are imported and trusted from within the UI. However, you can SSH to the manager nodes and trust the CA the “Linux way”. You can do this – if you like to live on the risky side, as this is definitely not supported by VMware!
The other (free) way to do this is via a Let’sEncrypt-generated certificate. This can be accomplished via Certbot and the offline signing way. Just note that you indeed will need a publicly available A record. Here is a tutorial on how to do this: Intranet SSL Certificates Using Let’s Encrypt | DNS-01 – b3n.org
As a last resort or if your repository will be published, you also can use a certificate signed by a public CA, which you will have to buy or generate free via Let’sEncrypt the “online way”.
Harbor installation
Now, we can download the Harbor installer. You can choose between an offline- and an online installer. I found the offline version to be more useful as it isn’t really that big and I like having the original installation package on the system.
Attention: For the offline deployment you will need a Harbor installation that is still supporting ChartMuseum so the helm charts for the Napp can be deployed correctly. The latest version still supporting this feature and that was working for me is v2.5.2. Here is the link to the GitHub repository: Release v2.5.2 · goharbor/harbor · GitHub
Please also note that you need to use a well-known Top-Level-Domain as your FQDN for harbor! .local- or .internal-Domains will not be accepted by the Napp deployment process!
Let’s download the installer and unpack it:
wget https://github.com/goharbor/harbor/releases/download/v2.5.2/harbor-offline-installer-v2.5.2.tgz
tar -xzvf harbor-offline-installer-v2.5.2.tgz
You will now have the required files in a subdirectory appropriately called “harbor”. Now we can copy and edit the template configuration file. Be sure to set the Hostname, Paths to your certificate and private key, as well as the passwords for the “admin”-user and the database connection.

cp harbor.yml.tmpl harbor.yml
nano harbor.yml
Now, we can run the install script with:
./install.sh --with-chartmuseumBe sure to include the –with-chartmuseum parameter as else the Napp repository will not work!
The install script will run for about 3-5 minutes. Check for any errors, warnings or issues during the installation. If everything runs smoothly, you will get a message telling you “Harbor has been installed and started successfully”.
You can check the deployed containers via “docker ps”.
Add the Napp repository to the Harbor Repo
In the Harbor Web UI, available at the Hostname set earlier, log in with the admin user. In the “Projects” tab, create a new project and give it an appropriate name like “napp”. Check the “Public” checkmark under “Access Level” and leave the Storage Quota at -1.
Now we can add the Napp binaries to the Repo. You will need to download the .tar-file directly from the NSX-Product Page at vmware.com and transfer the file to the machine hosting harbor. At the time of writing the newest package is named “VMware-NSX-Application-Platform-4.0.1.0.0.20606727.tgz”
Unpack the file with:
tar -xzf VMware-NSX-Application-Platform-4.0.1.0.0.20606727.tgzThis will unpack all the binaries and will take a considerable amount of time. When the process is finished, you will have all the binaries and two shell scripts to upload the packages to harbor.

Edit the “upload_artifacts_to_private_harbor.sh” file and enter your harbor details in the first 3 lines.
nano upload_artifacts_to_private_harbor.shBe sure to set the correct URL of the harbor project created – if you followed my lead it will be “your_fqdn/napp”. You don’t need to specify a protocol. Also, set the username “admin” and your password, which you’ve set in the install.sh script.
Now we can mark the script as executable and run it:
chmod +x upload_artifacts_to_private_harbor.sh
./upload_artifacts_to_private_harbor.sh
This process will also take some time, so grab a coffee (or three) and watch out for the successful output at the end of the script:
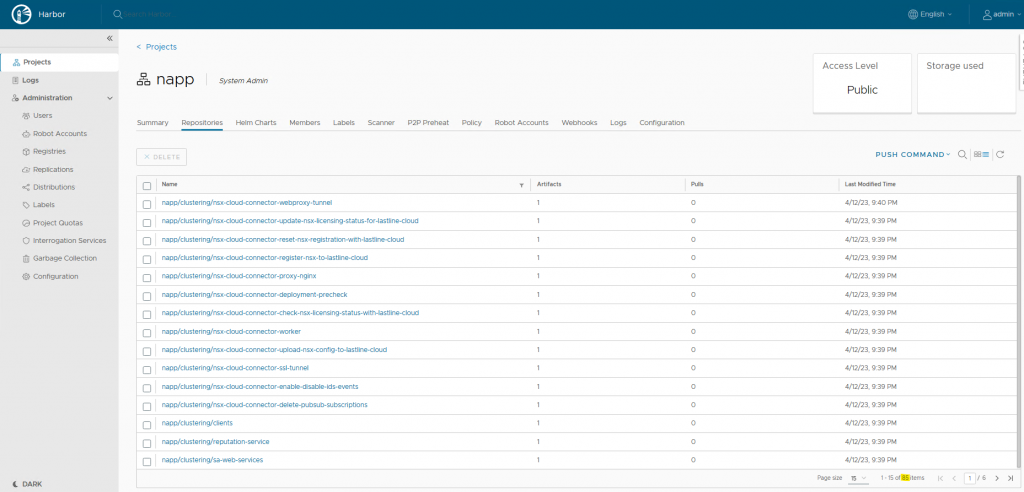
{"saved":true} {"saved":true} {"saved":true} {"saved":true} {"saved":true} ...Now, check back at the Harbor UI. In the project, you should see 85 Repositories and 17 Helm charts.
Setting up Resources for the Napp Deployment
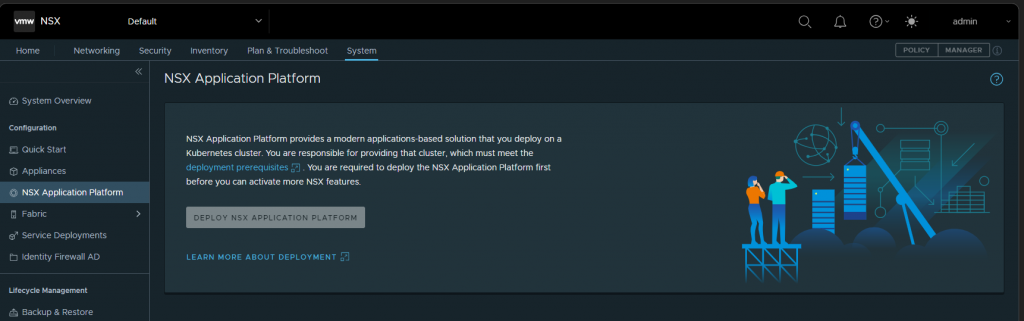
Now it’s finally time to log into NSX Manager and start the deployment. Go to “System” > “NSX Application Platform” and start with “Deploy NSX Application Platform”.
If you want to use VMware’s public repo, you can leave the default values – if you’ve set up your own Harbor instance in the previous steps, set the following values:
Helm Repository: https://HARBOR-FQDN/chartrepo/PROJECTNAME
Docker Registry: HARBOR-FQDN/PROJECTNAME/clustering
Replace the FQDN and your project name. If you followed my example, it should be “napp”. Also, note that the Docker Registry needs no protocol whatsoever, only the Helm Repo will need HTTPS.
Save the URL and wait for the manager to load. If you get any issues here it may have to do with your Domain Name not being qualified (e.g. using internal TLDs) or certificate issues. For troubleshooting you can SSH on a manager node and check via the “docker login” and “helm registry login” commands if you can connect to your Harbor instance.
If everything works correctly, NSX will display the target version currently residing in the repository. In my case, it is 4.0.1-0.0-20606727. Click Next.
Connecting the Cluster
Now we will need our Kubeconfig file. You can read it from a control plane node with this command:
cat /etc/kubernetes/admin.confSave the output to a text file (.conf or .yaml is fine) and upload it to NSX.
If you see a prompt wanting you to upload Kubernetes tools, your Kubernetes cluster doesn’t match the currently supported Kubernetes versions of the Napp deployment. As of writing supported versions are 1.20 through 1.24.
If the validation and connection succeed, you will now be able to select the storage class we created in the last post under the section “CSI / Container Storage Infrastructure”. Choose NFS-Client, as this is the default storage class created by our CSI plugin.
You will need to provide two FQDNs for the Interface and the messaging service for the NSX Management Cluster to interact with. Be sure to create Forward and Reverse DNS entries with corresponding IPs in your Kubernetes Load Balancer (MetalLB) range. The Napp Deployment will automatically assign the IPs to the pods.
Now you get to choose the form factor, which decides if you will be able to install NSX Intelligence or not. Be sure that your nodes are appropriately sized.
When you click next, a series of Pre-Run-Check will be displayed. Be sure to fulfill them all. If you get a warning about the Time Synchronization, you can ignore it, as long as your nodes display the actual time when you run “timedatectl”.
The last step holding you back is the review screen. Check again for any issues and click “Deploy”.
Deployment workflow
The application platform will now go through the deployment steps. First, the Cert-Manager and projectcontour applications will be deployed as they are needed for the actual platform. If you run into any issues here, it will most likely be your CNI’s fault.
Using K9S, which we installed in the previous step we can watch the deployment and look into the logs and describe the events of the pods. In the first stage watch out for the “cert-manager-startupapi” and “projectcountour-envoy” pods for any issues.
If these first two steps succeed, your CNI is probably working correctly.
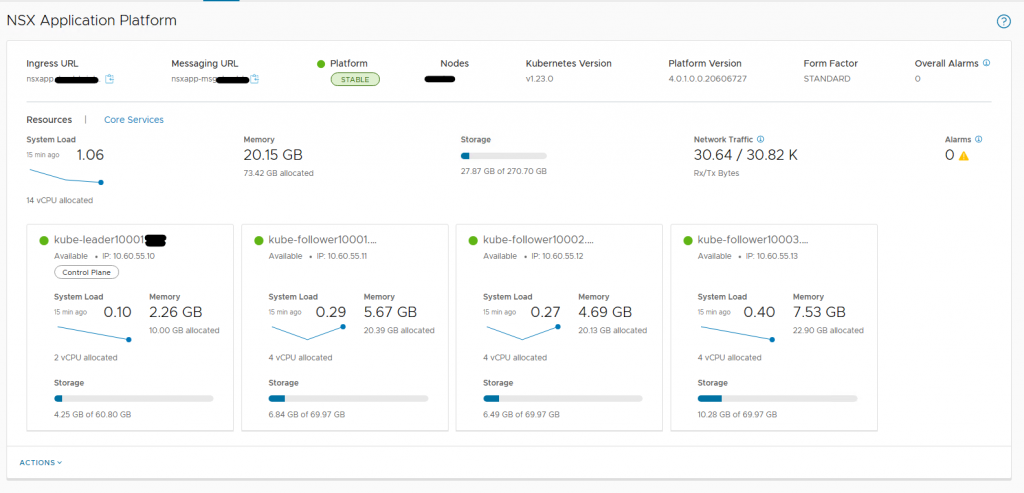
Next is the actual installation of the Napp. A good indicator here is the “postgresql-ha-postgresql” pod. If this is running ~5-10 minutes after the deployment and doesn’t create any error events when you describe the pod, you can lean back and enjoy the magic, as the rest should also work smoothly.
If everything works, you will be greeted by this nice overview.
From there on, you’re on your own – enjoy NSX Application Platform’s features😊